Convert 8-bit RGB channel values (0-255) or Hex color code to percentage values (0-1.0f) and back again.
December 30, 2012
September 21, 2012
Make Siri use Celsius instead of Fahrenheit for her weather report on the iPad
[UPDATE: Sept 2013] Since iOS7 came out this post became pretty much obsolete, because Siri will use your Region Format setting to determine which unit of measurement to use, pretty much means it'll just work. If you need a little reminder, its here: Settings > General > International > Region Format.
On iOS6, to have Siri report temperature in Celcius, the setup is in a strange place, its actually in the iPad clock app.
On iOS6, to have Siri report temperature in Celcius, the setup is in a strange place, its actually in the iPad clock app.
- Launch the new Clock App on your iPad running iOS6.
- Tap that Edit button on the top right.
- On the pop-over you'll see Fahrenheit is selected, simply tap on Celsius.
 |
| iOS6 |
August 1, 2012
Chinese fonts included in OSX Mountain Lion
There are a few nice additional Chinese typefaces in Mountain Lion, considering the cost of buying these fonts separately, upgrading to Mountain Lion is a tremendous bargain.
Most of these new fonts are not enabled by default and will only start downloading when you enable them in Font Book. Speaking of which, Font Book is updated in Mountain Lion, the typeface sample layout is improved.
I didn't include Japanese typefaces in OSX which are CJK fonts, they include extensive Kanji characters or Traditional Chinese, but without Simplified Chinese characters.
I'm not able to show the original size here, but you can download the original size image here (336 KB), choose "Actions" > "Download photo".
UPDATE: Apple list of all the fonts in iOS 6, and interestingly what additional typefaces you can optionally install with your App, a lot of the fonts listed here is in the optional table.
UPDATE 2: Mavericks added 2 additional Chinese typefaces, both hand written style and very good looking ones for both TC and SC versions.
苹果 OSX Mountain Lion 所具有的中文字型。不过大多需用者重 OSX Font Book App 里下载,绝对不难。以下图表最大版本下载,请选 "Actions" 然后选单里单击"Download photo".

June 9, 2012
Kingston ValueRAM KVR1333D3S9/4G works on iMac 2011

Wasn't sure if these would work on the iMac, specs meets Apple's but I tend to worry. Totally unwarranted, installed in less than 5 minutes, iMac accepts it. So if you were wondering about this particular model of RAM, yeah they work!
Ingredients:
1x iMac 2011
2x Kingston ValueRAM KVR1333D3S9/4G (These are 4GB modules)
5 Minutes to install with prior research and preparation
Added 2 modules of these 4GB Kingston RAM to the existing factory 4GB on the iMac for a total of 12GB, yep, works with the existing modules.
Technical skills required
Basic skills, you'll have to discharge static from your hands, and make sure the RAM is installed correctly, the OWC video at the end of this post shows how its done, its pretty easy.
Links:
You can find details of this model of RAM on this page on the Kingston website.
Official Memory Specs:
Apple's iMac 2011 Memory specs (See User Installable Slot Column):
Installation instructions:
OWC instructional video (YouTube)
September 20, 2011
Using D-Link DSL-2750U's Storage Service feature
UPDATE: My 2750U has kicked the bucket due lightning striking my house, quite a shame, while it wasn't much to look at, it performed very well, R.I.P little modem-router. And so dear reader, I am not able to try out any new firmware versions. That USB port on this model isn't a swift one, so if you can't see it or can't get it to work, my opinion, not something I'd lose sleep over. Have a great day. Love you, fellow human!
The manual doesn't explain this feature in detail, so here is a quick guide on using the Storage Service feature on D-Link DSL-2750U.
Open up any Windows Explorer window like My Computer for example and type the address of your D-Link router, by default its: "\\192.168.1.1"

Use "admin" for both username and password (without quotes). I did not see anyway to change that, might as well because it gives the impression the drive is secured by user accounts, which is not the case.
Go to Finder > Go > Connect to Server ...
And enter "SMB:\\192.168.1.1"

Use "admin" for both username and password (without quotes). I did not see anyway to change that, might as well because it gives the impression the drive is secured by user accounts, which is not the case.
I got both read and write access now, where as on firmware 1.0 it was only read and delete access, I'm not entirely sure if its because I have Fuse and NTFS-3G installed, which are for native writing to NTFS drives. So I guess you'll have to try and see, apologies.
(Everything below is for firmware SE_1.0)
If you didn't update the admin password at all, then the login username and password is the default admin and admin. You can update this under: Maintenance > Access Controls.
There are two links here, click on Storage Device Info first, you'll see your USB device listed, make note of the Volumename field, like for example: usb1_1.

Create a new user, this will be your account credential when you access your USB storage, create your username and password and fill in the VolumeName as noted earlier in Step 3. My Username is sundaymorning and the volumeName is usb1_1. Hit the Apply button and we are done with the admin interface.
Accessing your storage device on both Windows and Mac is pretty easy too, here are the steps.
\\192.168.1.1\sundaymorning\usb1_1
Note the pattern is: \\ Server Address \ Username \ Volume Name.
You'll be prompted for your login credentials you created earlier in Step 4, click OK and that's it!
You can add this address to Favorites or you can go the more advanced route of Mapping the Network Drive, I'm not familiar with Mapping, so for convenience here is a Google search result link if that is what you want to do.
Snow Leopard was my first OS X, but I'm guessing its the same with earlier versions since it is using SMB, I could be wrong. Make sure Finder is selected then choose Go > Connect to Server ... (or Cmd+K), then type in:
smb://192.168.1.1/sundaymorning/usb1_1
Note the pattern is: smb:// Server Address / Username / Volume Name.
Enter the username and password you created in Step 4, click Connect and done!
[Updated on Oct 29, 2012 added firmware 1.01 changes]
The manual doesn't explain this feature in detail, so here is a quick guide on using the Storage Service feature on D-Link DSL-2750U.
For firmware SE_1.01
You can see firmware version on the top right corner of the router control panel. On this version, Storage Service is much more direct, I like this a lot more. Here is how it can be accessed.Windows
Open up any Windows Explorer window like My Computer for example and type the address of your D-Link router, by default its: "\\192.168.1.1"

Use "admin" for both username and password (without quotes). I did not see anyway to change that, might as well because it gives the impression the drive is secured by user accounts, which is not the case.
Mac
Go to Finder > Go > Connect to Server ...
And enter "SMB:\\192.168.1.1"

Use "admin" for both username and password (without quotes). I did not see anyway to change that, might as well because it gives the impression the drive is secured by user accounts, which is not the case.
I got both read and write access now, where as on firmware 1.0 it was only read and delete access, I'm not entirely sure if its because I have Fuse and NTFS-3G installed, which are for native writing to NTFS drives. So I guess you'll have to try and see, apologies.
(Everything below is for firmware SE_1.0)
For firmware SE_1.0
On firmware SE_1.0, Storage device is read and delete but not write access if accessed from a Macintosh; on Windows, you can both read and write to the drive.Step 1
Plug in your USB device into the USB port at the back of the DSL-2750U, you should see the USB indicator light at the front panel light up when it's recognized.Step 2
Go to the router's administration interface on your computer, access this on your web browser by typing in http://192.168.1.1/If you didn't update the admin password at all, then the login username and password is the default admin and admin. You can update this under: Maintenance > Access Controls.
Step 3
Now head to Advanced > Storage Service.There are two links here, click on Storage Device Info first, you'll see your USB device listed, make note of the Volumename field, like for example: usb1_1.
Step 4
This is the main step, head to Advanced > Storage Service > User Accounts, the screenshot below shows this page.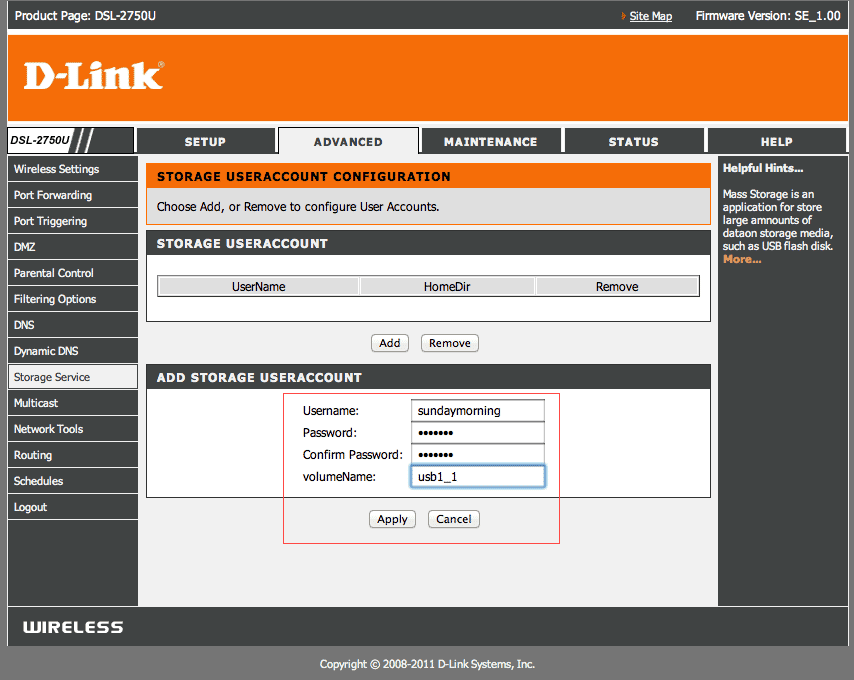
Create a new user, this will be your account credential when you access your USB storage, create your username and password and fill in the VolumeName as noted earlier in Step 3. My Username is sundaymorning and the volumeName is usb1_1. Hit the Apply button and we are done with the admin interface.
Accessing your storage device on both Windows and Mac is pretty easy too, here are the steps.
On Windows XP
Launch Windows Explorer, just any window basically and type in:\\192.168.1.1\sundaymorning\usb1_1
Note the pattern is: \\ Server Address \ Username \ Volume Name.
You'll be prompted for your login credentials you created earlier in Step 4, click OK and that's it!
 |
| Type in the address any window's address bar (top), the login panel will appear. |
 |
| Once logged in successfully, you can start browsing the volume! |
On OS X
This doesn't work well with Macs. On all media and formats I tried, I can read and copy files, even delete files, but could not write to it, the Finder error I get is along the lines of "no space available ..." on the device. Those media I tried were empty, and I can write to them via Windows without problem. Especially the FAT32 formatted USB thumb drive where I can write to it on the Mac if connected directly.Snow Leopard was my first OS X, but I'm guessing its the same with earlier versions since it is using SMB, I could be wrong. Make sure Finder is selected then choose Go > Connect to Server ... (or Cmd+K), then type in:
smb://192.168.1.1/sundaymorning/usb1_1
Note the pattern is: smb:// Server Address / Username / Volume Name.
Enter the username and password you created in Step 4, click Connect and done!
 |
| Type the address here at, Finder menu > Go > Connect to Server ... then hit the Connect button |
 |
| Finally, type in your login credentials and hit the Connect button, if everything is set correctly, the file browser will appear, however it seems to be read only for Macs. |
[Updated on Oct 29, 2012 added firmware 1.01 changes]
September 12, 2010
A dynamic sidebar implementation in Zend Framework
This is for displaying a dynamic set of small boxes or modules of content on a side column of a website, like maybe a box that displays a shopping cart summary, or a box that shows advertisement.
The outline of this method is:
- Declare an array of classes to run, each class represents a boxed module on the page.
- Each module's data is collected as an associative array and sent to the view.
- In the layout, loop through this data and then call each partial passing along the data set when there is one.
Here is a picture of the outcome:
September 7, 2010
Select All Checkboxes With jQuery
There are other ways to do this, but this way is pretty easy and it works nicely. As simple as it is though, I still tend to forget the syntax, so at least I'll know where to look when I forget.
(Please note that blogger removes my closing forward slashes.)
(Please note that blogger removes my closing forward slashes.)
<form action="" id="formFooBar" method="post">
<input id="select-all-jq" type="checkbox" /> <label for="select-all-jq">Select all with jQuery</label>
<input id="select-all-js" type="checkbox" /> <label for="select-all-js">Select all with JavaScript</label>
<hr />
<input class="foo-list" name="bar[1]" type="checkbox" /> Some
<input class="foo-list" name="bar[2]" type="checkbox" /> Checkboxes
<input class="foo-list" name="bar[3]" type="checkbox" /> for testing
<input class="foo-list" name="bar[4]" type="checkbox" /> script
</form>
Select all using jQuery
    $("#select-all-jq").click(function(){
        if(this.checked) {
            $(".foo-list").attr('checked','checked');
        } else {
            $(".foo-list").removeAttr('checked');
        }
    });
Subscribe to:
Posts (Atom)